

Speed vs Power: Understanding Before-Save and After-Save Flows in Salesforce
If you’ve ever built a record-triggered flow in Salesforce and paused at the choice between “before-save” and “after-save,” you’re not alone. Many Salesforce admins and developers wonder which flow type is best for their automation needs. The good news? It’s simpler than it seems.
Salesforce Flow has become the low-code automation powerhouse of the platform, allowing users to automate complex business processes without writing a single line of code. As tools like Process Builder and Workflow Rules take a backseat, understanding record-triggered flows—and the differences between before-save and after-save flows—has become essential for building efficient, reliable, and scalable automations.
In this guide, we’ll break down the key differences between before-save and after-save flows, show you when to use each type, and provide practical tips so you can confidently choose the right flow type every time.
Before-Save Flows (Fast Field Updates)
What They Are
Before-Save flows run before the record is committed. Think of them as a pre-processing step that happens in memory.
Characteristics:
-
Extremely fast—can be 10x faster than after-save flows
-
Only updates fields on the triggering record
-
Cannot create related records, send emails, or perform other actions
-
Ideal for auto-populating fields or normalizing data
How They Work
Before-Save flows operate in memory before the record hits the database. Any field updates made in the flow are saved as part of the record’s initial save. Because no extra database operations are required, governor limits are preserved, and performance is optimized.
Example Use Cases:
-
Auto-fill a Status field based on Priority (e.g., set Status = “New” if Priority = “High”)
-
Updating a field like “Source Category” on a new Lead
-
Calculate a discount based on a picklist value
-
Set default values or normalize text fields
-
Stamping a “Closed Date” when Opportunity Stage changes to Closed Won
Why Use Before-Save Flows:
-
Fast field updates without additional DML
-
Reduces the need for Apex code
-
Helps stay within governor limits in high-volume orgs
Tip: Think of before-save flows like a smartphone’s autocorrect—it fixes or sets things automatically before the user finishes the action, saving time and errors.
After-Save Flows (Actions and Related Records)
What They Are
After-Save flows execute after the record has been saved. At this point, the record and its ID exist in the database, giving you more flexibility.
Characteristics:
-
Can create, update, or delete related records
-
Can send emails, post to Chatter, call Apex, or invoke subflows
-
Requires explicit DML for updates to the triggering record
-
Slightly slower than before-save flows because of additional database operations
How They Work
Since after-save flows run post-commit, they have access to the record’s ID and any related data. They can perform multiple operations, including cross-object updates and external system calls. However, this extra capability comes with additional DML overhead, so optimization is key.
Example Use Cases:
-
Create a related Contact when an Account is created
-
Sending email notifications after a record change
-
Generate a Task when an Opportunity moves to “Closed Won”
-
Update a parent record based on child changes
-
Logging activity in a history object or invoking a subflow
Why Use After-Save Flows:
-
Full access to record ID and related objects
-
Supports complex automation and multi-record processing
-
Enables actions that must occur after the record exists in the database
Step-by-Step Decision Guide: Choosing the Right Flow Type
Use this flowchart approach to determine the correct type:
1. Is the flow only updating fields on the triggering record?
-
Yes → Before-Save Flow
-
No → Go to step 2
2. Is performance critical?
-
Yes → Before-Save Flow
-
No → Go to step 3
3. Do you need to create/update related records, send emails, or perform complex logic?
-
Yes → After-Save Flow
-
No → Before-Save may still be sufficient
4. Do you need the record’s ID or post-save values?
-
Yes → After-Save Flow
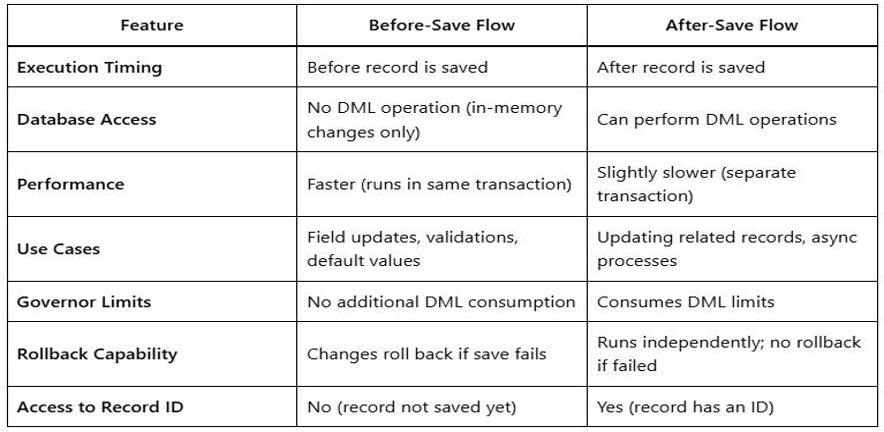
Key Differences at a Glance
Execution Timing
-
Before-Save: Runs before the record is saved to the database, similar to a “before trigger” in Apex.
-
After-Save: Runs after the record is saved, like an “after trigger,” with the record ID already available.
Performance
-
Before-Save: Ultra-fast. Updates happen in-memory during the save operation, avoiding an extra database update. No extra DML is required, and execution can be up to 10x faster than after-save flows.
-
After-Save: Slightly slower. Updates occur after the initial save and require explicit DML, counting against governor limits. Efficiency differences matter most in bulk or high-volume operations.
Allowed Actions
-
Before-Save: Can only update fields on the triggering record. Supported elements include Assignment, Decision, Loop, and Get Records. Cannot create/delete records or send emails.
-
After-Save: Full range of actions: Create Records, Update Records (any record), Delete Records, Send Email, Post to Chatter, Launch Subflows, and Scheduled Paths.
Best Practices
-
Use Before-Save for simple, fast field updates
-
Use After-Save for related object changes or external actions
-
Avoid updating the same record in an after-save flow to prevent recursion
-
Optimize DML operations in an after-save flow to prevent hitting governor limits
-
Use fault paths for error handling in an after-save flow
-
Keep flows modular — split complex logic into separate flows
-
Use Decision elements wisely to reduce unnecessary checks
Conclusion
Mastering the right flow type is key to building Salesforce automations that are not only correct but also fast, efficient, and reliable. By understanding when to use each flow, you’ll make smarter decisions, avoid unnecessary complexity, and keep your org running smoothly. Stick to the right flow for the job, and your automations will work seamlessly—making your life as an admin or developer a whole lot easier.